4 Inch Spread Bathroom Faucets

4 Inch Spread Bathroom Faucets

Replacing a bathroom faucet is a bit more daunting than, say, changing your shower head. But despite the number of steps involved, it's actually not as hard as it seems. Whether you're looking to replace an outdated style, are in need of an upgrade, or simply feel like switching it up, here's how to replace your current bathroom faucet with a brand-spanking-new one. The steps below will ensure your new faucet is ready to go in no time!

Materials:

  • New faucet
  • Adjustable wrenches (in different sizes)
  • Rubbing alcohol or all-purpose cleaner
  • Rag
  • Plumber's tape
    Matte Black Faucet

    Matte Black Faucet

    Parlos Home wayfair.com

    $67.99

    Chrome Faucet
    Gold Bathroom Faucet
    Chrome Faucet

    Chrome Faucet

    MOEN homedepot.com

    $99.00

    How to Replace a Bathroom Faucet:

    1. Determine the type of faucet designed for your sink, which will have one, two, or three holes and be center-set or widespread.
    2. Buy a new bathroom faucet that will fit your sink design.
    3. Gather your materials: adjustable wrenches (one big and one small), rubbing alcohol or all-purpose cleaner, a rag, and plumber's tape.
    4. To remove the old faucet, start by turning off the water supply using the valves underneath the sink
    5. Clear any items stored under the sink to make the faucet parts easier to reach.
    6. Place a bucket under the pipes to catch any water spills.
    7. Once the water supply is off, turn on the faucet to drain any remaining water in the pipes.
    8. Disconnect the hot and cold water supply lines to the faucet.
    9. Remove the nuts under the sink that secure the faucet using an adjustable wrench.
    10. With a bucket nearby, use a wrench to unscrew the slip nut on the P-trap pipe.
    11. Disconnect the lift rod.
    12. Pull up the old faucet assembly from the top until it clears the sink.
    13. Clean around the faucet holes and old drain with rubbing alcohol or all-purpose cleaner and wipe with a rag.
    14. Place the gasket over the faucet holes.
    15. Place the flange over the drain hole in the sink and screw the tailpiece to the flange.
    16. Tighten the tailpiece nut and gasket.
    17. Attach the tailpiece to the P-trap and tighten with the wrench.
    18. For extra security, wrap plumber's tape around the tailpiece to make it more leak resistant.
    19. To install the new faucet, put the gasket on first.
    20. Insert the faucet through the matching holes and tighten the nuts.
    21. Attach them by hand, then tighten securely with a wrench.
    22. Attach the lift rod to the drain tailpiece.
    23. Reconnect the water supply lines.
    24. Turn on the water using the valves underneath the sink.
    25. Test the cold and hot water taps.
    26. Check all of the new connections for leaks above and below the sink.

      Have questions about your next renovation project? We've got answers. Let's do this together.


      Follow House Beautiful on Instagram .

      Kelly Allen is a writer based in New York and the editorial assistant at House Beautiful, where she covers design, culture, shopping, and travel.

      This content is created and maintained by a third party, and imported onto this page to help users provide their email addresses. You may be able to find more information about this and similar content at piano.io

      4 Inch Spread Bathroom Faucets

      Source: https://www.housebeautiful.com/home-remodeling/diy-projects/a36740829/how-to-replace-bathroom-faucet/

      Share:

      European Wet Room Bathroom

      European Wet Room Bathroom

      • Project of the month
    27. We earn a commission for products purchased through some links in this article.

    28. Want a wet room, but not sure whether it will work in your home? Read on for the advantages and disadvantages of wet rooms, along with some expert design tips

      Wet rooms are becoming more and more desirable, and they're a great way to add value to your home. But how exactly do you go about designing a wet room? We've put together a handy guide with everything you need to know, from what tiles to choose to specialist wet room companies you can contact about installation.

      Want more bathroom ideas? READ: Small bathroom ideas to optimise your tiny space

      Can anyone have a wet room?

      In theory, yes. Wet rooms are basically shower rooms that do away with the shower screen and tray, and have an open, fully tiled shower area. If your bathroom is on the small side you probably will need to include a shower screen to prevent everything getting sprayed.

      Hammam-style wet room wet rooms

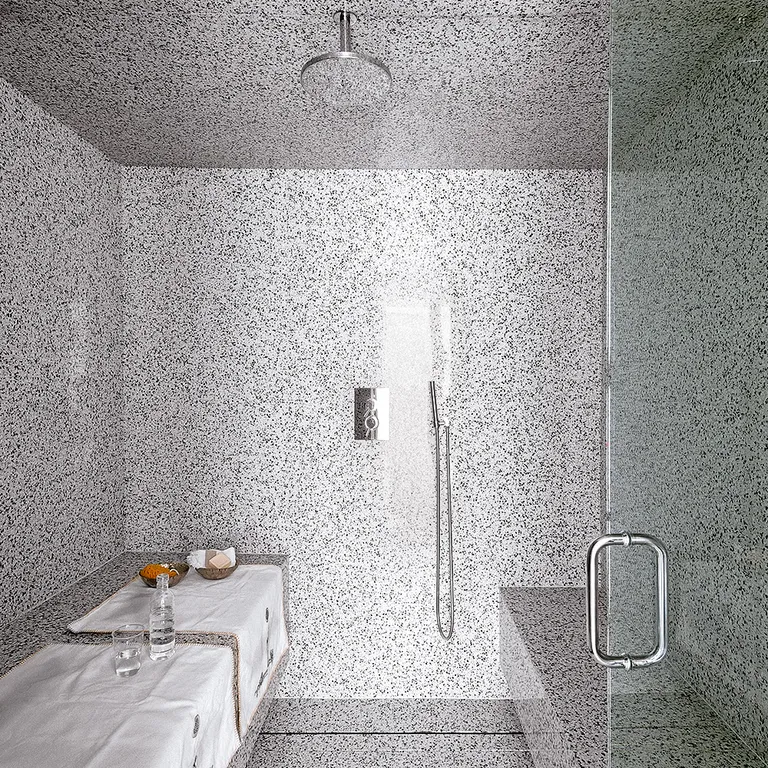
      Image credit: Matthew Williams

      Water drainage

      Installing a wet room is a job for the professionals, as a gradient needs to be created along the floor to channel the shower water into a drain and then the entire room needs to be tanked (waterproofed).

      The most common method for creating a gradient is to install a sub-floor made from WBP Ply (a type of plywood), which is then tiled over.

      Another option is to install a ready-made sloping shower former (a bit like a giant shower tray), which is also then tiled over.

      A final method is to use a bespoke floor in the non-porous material HI-MACS that slopes towards a drain, and can be fitted across the entire floor without the need for tiling over.

      Related: See these Shower Room ideas.

      Waterproofing

      Waterproofing wet rooms involves priming the floor, the lower section of the walls and the whole of the wall area around the shower and then covering with a syrupy membrane. Once it's set, the room is then tiled.

      It's also worth raising the bathroom door threshold by about 5mm from the floor in case the room fills with water (if someone covers the shower drain with a towel, for example). This will keep the water contained.

      Related: Modern Bathroom Flooring ideas

      Luxe wet room with traditional shower wet rooms

      Image credit: Damian Russell

      Layout

      Image credit: C.P. Hart

      Rebecca Milnes, Designer at C.P Hart says, 'One of the first things to consider when planning a wet room is where to position the drain. Ideally the drain should be as far away from the bathroom door as possible to minimise any risk of water escaping the room.

      If you have a wooden sub-floor, the way your joists run is crucial to where your drain can be positioned. You'll also need to think about which way the gradient falls towards the waste will run, to avoid any tricky wedging effects.'

      Advantages of wet rooms

      Image credit: C.P. Hart

      • Wet rooms are super-stylish and perfect for creating a contemporary look.
      • As a second bathroom, a wet room can easily increase the value of your home.
      • Great for small bathrooms – removing the bath creates loads more space.
      • Wet rooms are, in general, easier to clean. There's no shower screen or tray to worry about and if you go for a wall-hung sink and toilet, it's easier still.
      • If it's done properly, your floor (the bit under the tiles) is better protected than it would be in a standard bathroom.

      Related: If a wet room isn't for you, have a look at our shower room ideas

      Compact wet room with built-in tiled shelves wet rooms

      Image credit: Simon Brown

      Disadvantages of wet rooms

      • In small bathrooms, watch out for wet towels and soggy loo roll caused by spray from the shower.
      • You'll need a professional fitter to waterproof the room – if it's not done properly, leaking water can cause damage.
      • Wet rooms should be tiled from floor to ceiling – and that's expensive. And if you go for porous stone tiles, they may need to be resealed every few months, which is hard work.
      • Swapping a main bathroom for a wet room could make your home less saleable – buyers want at least one bath.

      Related: 10 Ways to make your Bathroom feel Bigger

      Rustic spa-style wet room with turquoise accents wet rooms

      Image credit: Lucinda Symons

      Related: Hotel-style bathroom ideas to inspire a luxurious scheme

      How much will a wet room cost?

      The cost of installing a wet room is usually between £5,000 and £10,000. If you are paying a company to tank and install a wet room, including floor-to-ceiling tiles, suite and shower, expect to pay more. Retailers such as Victoria Plum and Wickes may offer you some ideas or can sell you those little extras you need to complete your wet room.

      grey tiled wet room wet rooms

      Image credit: Jake Fitzjones

      What type of surface materials should I use in a wet room?

      Tiles are the most popular wall and floor covering, but you can opt for sheet vinyl for the floor, or even Corian, which is a seamless, non-porous material that is low-maintenance. Concrete and tadelakt (a waterproof plaster from Morocco) will lend your wet room a rough luxe look.

      If you are going to use tiles, choose non-porous bathroom tiles like ceramic or porcelain. Porous tiles, such as slate, marble and limestone need sealing every few months to prevent water damage. Only use floor tiles specifically for bathrooms on the floor so they aren't slippery.

      C.P. Hart designer, Rebecca Milnes says 'When deciding which wet room system to go for, think about what your sub-floor is made of. There are systems for both solid and wooden floors.

      Forgoing a shower tray in favour of a wet room allows the floor tiles to run through to the shower, which adds visual space to a room. However, not all surfaces are safe in a wet room.

      It is crucial to know the slip rating of materials. I'd recommend using a material with a structured, textured finish to give extra grip. Mosaics are a great choice for wet areas, as the grout between the tiles gives appropriate grip.'

      Try Topps Tiles for a good selection for your wet room.

      Can I install underfloor heating?

      Many fitters recommend installing underfloor heating as it keeps the tiles warm underfoot and helps to dry out the water on the floor.

      Spacious wet room with double shower wet rooms

      Image credit: Nikki Crisp

      Wet room decorating ideas to consider before you start

      Before you even think about getting the builders in, make sure you have thought through every element of your wet room scheme. From shelving to shower fittings, take your time in the planning stage to ensure that everything will be just as you want it.

      Choose your sanitaryware

      Rebecca Milnes, Designer at C.P. Hart says, 'If you're embracing the full wet room and foregoing any kind of screen, it is essential to think about your choice of sanitaryware, as it is likely to get wet from the shower spray or condensation in the room. Opt for ceramics that are flush to the wall and ideally wall-mounted. A wall-hung toilet is a brilliant choice in a wet room, as there are no areas for water to pool and makes cleaning easier.'

      Pick your shower fittings

      Wet room brown tiles wet rooms

      Image credit: Polly Eltes

      Decide whether or not you want shower valves to be exposed or concealed. Exposed shower valves work well in a modern country scheme and are also easier to install. But if you want a super-sleek look, a fixed rainwater shower head with concealed pipework can't be beaten. If you only install a fixed shower head, it can be hard to avoid getting your hair wet – annoying if you don't shampoo every time, and they're not terribly useful for cleaning the shower. The best solution is to include a handheld shower as well.

      Double up

      Side-by-side showers are perfect for bathrooms designed for sharing,' says Jonathan Carter at Victoria & Albert Baths. 'It's often a style you'll find in luxury hotels and allows plenty of personal space while making a bold statement. Try pairing with a freestanding tub to enjoy the best of both worlds.'

      Choose sleek modern drainage

      Wet room tiles and seat wet rooms

      Image credit: Mark Bolton

      Longing for an invigorating power shower? Then you'll need to install a drain that can handle high water volumes efficiently. A flush-fitting, channel-style drain collects water across its full width, effectively preventing floods. Look for a drain with an easy access dirt trap to help keep the water running freely.

      Create a natural partition without glass

      Wet room partition wall wet rooms

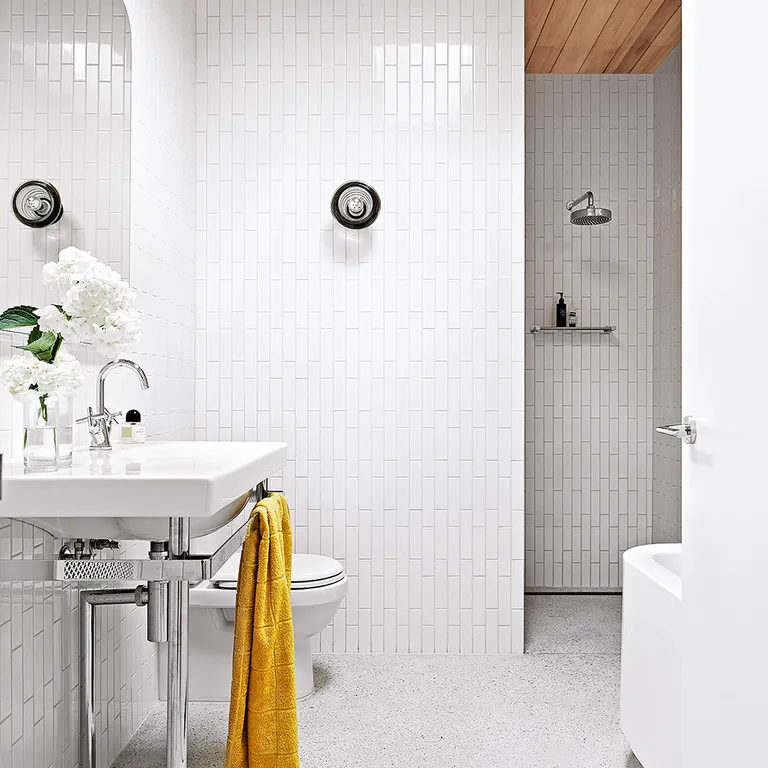
      Image credit: Armelle Habib

      Many wet rooms have a glass panel for containing splashes, but that's not the only way to section off the shower part of your wet room. A tiled partition wall is also a great way to stop water from flowing all over the room, while providing the easy walk-in access that makes wet rooms so popular.

      Store well

      Neutral wet room tiles wet rooms

      Image credit: Matt Cant

      Allocating a dedicated space for storing shampoo and soap inside your shower area is essential. One of the smartest solutions is niche shelving, which can be built into a stud wall at construction stage. Unlike chrome racks and rails, niche storage doesn't encroach on your showering space. It's important to tile the actual shelf on a slight gradient to prevent water from pooling at the back. Add discreet waterproof lighting to softly illuminate.

      Useful contacts

      It's best to employ a specialist company rather than a separate builder, plumber and tiler. The Kitchen Bathroom Bedroom Specialists Association (kbsa.org.uk) and the Federation of Master Builders (fmb.org.uk) both have online databases of specialists in your area. Before choosing a company, ask to see examples of their work.

      Also try:

      Bathstore – design and installation of wet rooms (including sanitaryware)

      Homebase – supplies wet room panels and kits

      Video Of The Week

      Solidity – offers an alternative to tanking using HI-MACS

      Wetrooms UK – provides a tanking service with a 10-year guarantee

      Wetrooms Online – wet room products and installation guides

      C.P. Hart – this premium bathroom retailer has in-house designers who can help plan your scheme

      Related: See all the Bathroom Tile Trends

      Have you been converted, or will you be sticking with a more traditional bathroom for now?

      European Wet Room Bathroom

      Source: https://www.idealhome.co.uk/bathroom/bathroom-advice/wet-rooms-the-essential-guide-shower-room-ideas-85882

      Share:

      Bathroom Exhaust Fan Wall Installation

      Bathroom Exhaust Fan Wall Installation

      Installing a ventilating fan in your bath will help eliminate fogged-up windows, steamy mirrors and stale odors. But more importantly, it will help prevent moisture-related problems, such as the growth of mold and mildew. Here, This Old House general contractor Tom Silva shows the proper way to install a bath vent fan. In this particular installation, Tom ran the exhaust duct into the attic and through a sidewall to the outdoors.

      Other venting options includes running the duct up through the roof or down through the soffit. Note that the bathroom vent fan must always exhaust to the outdoors; never allow the duct to simply blow into an attic, crawlspace or other enclosed area. Also, the installation of the bathroom exhaust fan will go much quicker if you ask a spouse or friend to help be in the attic while you work from below, or to hand you tools while you're on the ladder.

      Step 1: Bath Vent Overview

      Photo by Keller & Keller Photography

      A bathroom without a ventilation fan is like a fireplace without a chimney: If you fail to pull the moisture generated in the bathroom out of there, it will migrate into the walls and grow mold and mildew, or blister paint and peel wallpaper. One reason many households still don't have bath fans is that they can be intimidating to install.

      That's why we asked This Old House general contractor Tom Silva to show us how. The bathroom here is below an accessible attic, so Tom ran the exhaust duct across the attic and out a gable end.

      Bathroom vent fans are rated by how many cubic feet of air they can move in one minute, known as the CFM rating. To determine which size fan to buy for your bath, multiply the room's square footage by 1.1. For example, a 100-square-foot bath would require a 110 CFM-rated fan. Fans also have a sound rating, measured in sones. (A modern refrigerator operates at about one sone.)

      Vent fans range from as low as 0.5 sone up to about 6.0 sones. You'll find both the CFM and sone ratings printed on the vent fan's box.

      Step 2: Drill a Reference Hole

      Photo by Keller & Keller Photography
      • Draw a mark on the bathroom ceiling where you'd like to install the vent fan. For optimum performance, locate it between the shower and the toilet.
      • Use an extra-long, 3/8-inch-diameter spade bit to bore a reference hole through the ceiling and into the attic. Climb into the attic and clear away any insulation from around the hole. Now use the reference hole to determine the exact position of the fan.
      • Measure the vent fan housing. Try to position the vent fan directly between two joists near your reference hole. Take into account any nearby pipes or other obstructions. Note the final position of the vent fan in relation to the reference hole.

      Step 3: Mark the Ceiling

      Photo by Keller & Keller Photography
      • Back in the bathroom, measure the inside dimensions of the vent fan's intake port to determine what size hole you need to cut in the ceiling.
      • Use the reference hole as a landmark to transfer your measurements from the attic to the ceiling.
      • Use a layout square or framing square to draw the rectangular outline of the intake port onto the ceiling.

      Step 4: Cut the Intake-Port Hole

      Photo by Keller & Keller Photography
      • Using a jigsaw (a reciprocating saw or drywall saw will also work), and wearing goggles and a respirator, cut through the ceiling on the layout lines.
      • When you're almost finished making the rectangular cutout, support the waste piece with one hand to keep it from falling and possibly taking some of the surrounding drywall or plaster ceiling with it.

      Step 5: Position the Fan

      Photo by Keller & Keller Photography
      • Back in the attic, attach a 4-inch, 90-degree duct elbow to the outlet port on the side of the vent fan housing. Aim the elbow straight up and secure it to the port with foil duct tape.
      • Remove the knockout hole on the side of the fan's housing and attach a cable connector.
      • Slide the four metal brackets into the tabs protruding from the sides of the vent fan.
      • Set the vent fan down into place between the joists, centered on the ceiling hole.

      Tip: Use foil duct tape; unlike fabric duct tape, it won't deteriorate over time.

      Step 6: Attach the Fan to the Joists

      Photo by Keller & Keller Photography
      • Fully extend the brackets until they come in contact with the sides of the joists.
      • Secure each bracket end with a single 1½-inch drywall screw.
      • Take the flexible duct that comes with the wall cap kit and slip one end over the elbow attached to the vent fan. Secure it with foil duct tape.
      • Feed the existing or new electrical cable through the connector, then tighten the connector screw to secure the cable.

      Step 7: Cut a Duct Hole Through the Sidewall

      Photo by Keller & Keller Photography
      • From inside the attic, select a spot on the sidewall for the flexible duct to exit the house. The location should be between two wall studs and within 6 feet of the vent fan.
      • Take a couple of reference measurements so that you can locate the spot from outside—from a nearby window, soffit, or other feature you can access from outdoors.
      • Mark the hole location on the siding, using the reference measurements.
      • Cut the duct hole through the house wall using a 4-inch hole saw.

      Step 8: Attach the Exhaust Duct to the Wall Cap

      Photo by Keller + Keller Photography
      • After securing the wall cap to the outside wall, move into the attic.
      • Grab the free end of the flexible exhaust duct and carefully stretch it to the outside wall.
      • Attach the duct end to the wall cap's connector duct with foil duct tape.

      Step 9: Install the Wall Cap

      Photo by Keller & Keller Photography
      • Fasten the 12-inch-long connector duct to the wall cap with foil duct tape.
      • From outside, slide the wall cap into the duct hole and push it tight against the house siding. Cut a foam-rubber gasket to fit into any spaces where the wall cap doesn't contact the siding.
      • Remove the wall cap and apply a bead of silicone adhesive to the siding and gasket around the hole.
      • Slide the wall cap into the hole and press it against the siding. Secure it to the siding with four 1½-inch stainless steel screws.

      Step 10: Make the Wire Connections

      Photo by Keller & Keller Photography
      • From the bathroom, unscrew and remove the blower motor from the vent fan housing. Save the screws.
      • Next, unscrew the built-in receptacle from inside the housing to expose its wiring. Again, save the screws.
      • Use wire nuts to join same-color wires with the ones from the electrical cable you fed into the housing in Step 5: white to white, black to black.
      • Wrap the bare copper wire under the green grounding screw inside the housing and tighten the screw.
      • Place the electrical receptacle back into position and secure it with the two screws removed from it earlier.

      Step 11: Attach the Grille

      Photo by Keller & Keller Photography
      • Raise the blower motor up to the ceiling, then push its plug into the electrical receptacle inside the housing.
      • Secure the motor to the housing with the screws removed from it earlier.
      • Hold the fan's plastic grille close to the ceiling. Slip the grille's mounting wires into the slots inside the fan housing.
      • Push up on the grille until it's tight against the ceiling.
      • Turn the power back on and test the fan.

      Tip: If the grille doesn't hold tight against the ceiling, spread apart its mounting wires to create more tension.


      Tools:

      Bathroom Exhaust Fan Wall Installation

      Source: https://www.thisoldhouse.com/bathrooms/21016701/how-to-install-a-bathroom-vent-fan

      Share:
      banner